Setting Up Page Redirects
Complexity Level: Advanced
Overview
Redirects automatically send visitors from one web address to another. They're useful when you've moved or renamed pages, or when you want to use a shorter, easier-to-remember address. With Springboard's redirect feature, you can make sure visitors always find the right content, even if they're using an old or outdated link.
When to Use This Feature
You'll want to set up redirects when:
- You've moved a page to a new location
- You've renamed a page, changing its web address (URL)
- You want to create a short, memorable URL that points to a longer one
- You're replacing an old page with a new one
- You want to direct traffic from an old campaign or event to a current one
- You're restructuring your website but don't want to break existing links
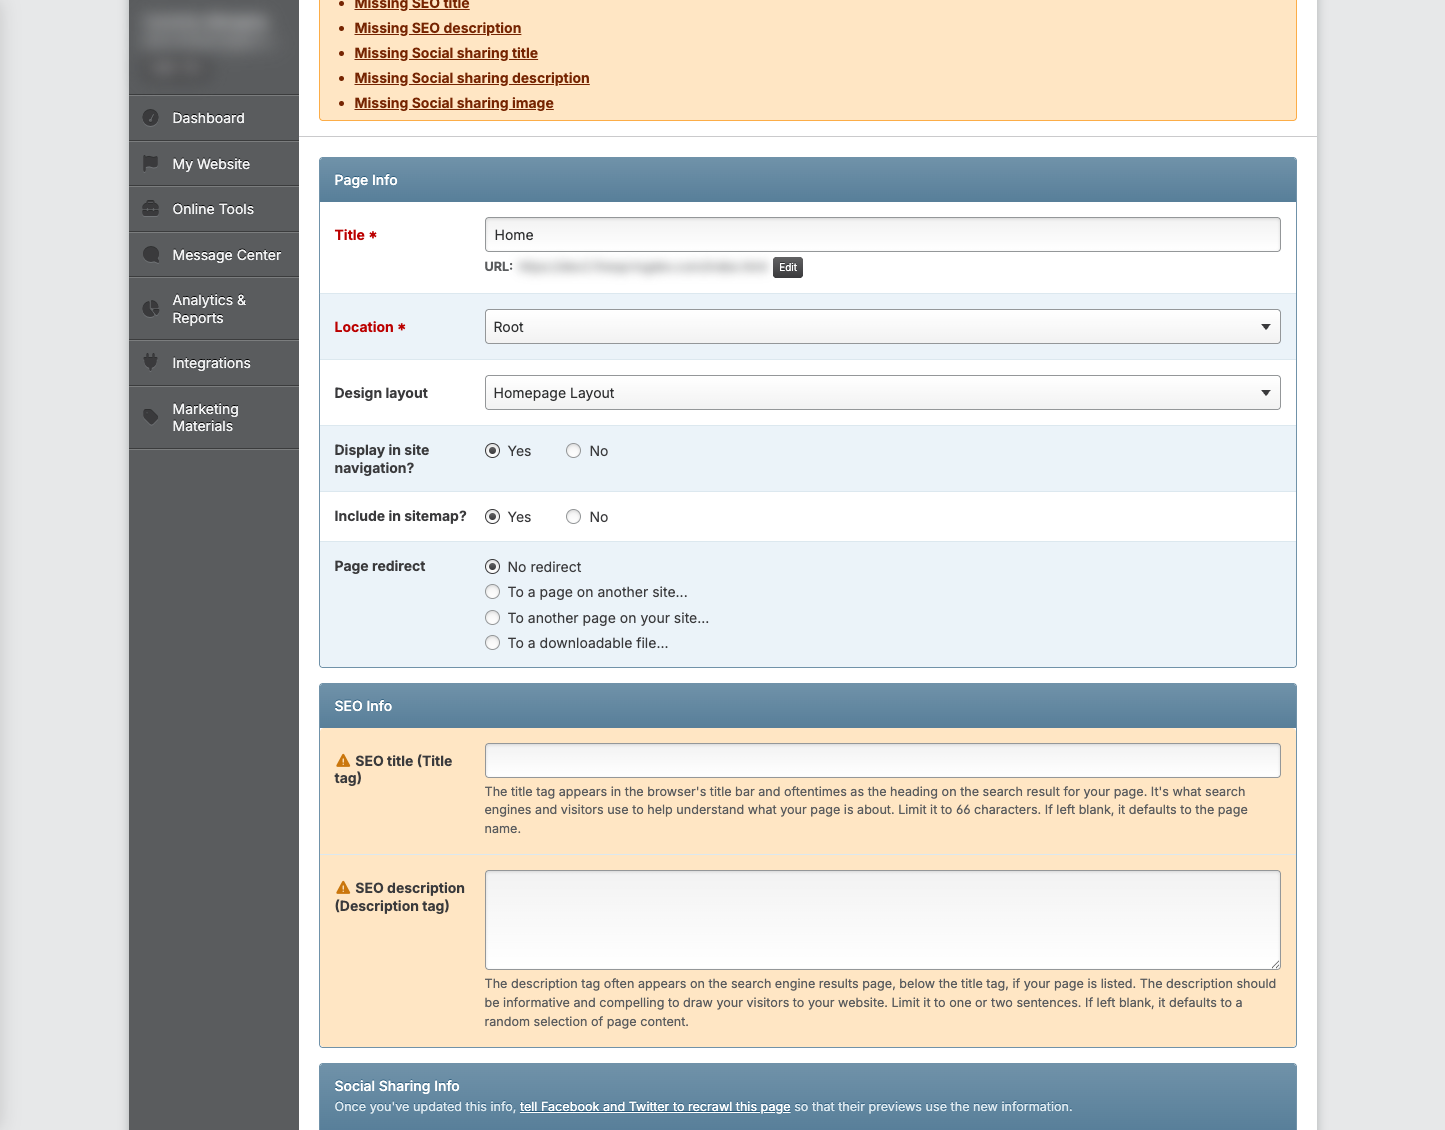
Step-by-Step Instructions
Setting Up a Redirect
- In your Site Structure, locate the page you want to redirect.
- Click the gear icon next to the page.
- Click Edit page info.
- In the Page info section locate Page redirect.
- Toggle to your preferred redirect type:
- To a page on another site: Enter your Page URL and toggle to your preferred Redirect code.
- To another page on your site: Choose your Site structure and Site page using the dropdown menus. Toggle to your preferred Redirect code.
- To a downloadable file: Click Select File to choose your file, then toggle to your preferred Redirect code.
- Scroll to the bottom of the page and click Save & Finish.
Your redirect is now active. When someone tries to visit the source URL, they'll automatically be sent to the destination URL.
Adding Redirects in Bulk
First you will need to set up a CSV file with your redirect information.
Formatting a CSV File to Import
- Open Excel or Google Docs on your computer.
- Title Column 1 Old URL.
- Title Column 2 New URL.
- Copy the Old URLs into column 1.
- Paste the New URLs next to the coordinating Old URL in column 2.
- Save your file as a CSV.
- Send your CSV file to your Client Onboarding Consultant at Firespring, or to the Client Success Team at support@firespring.com.
Requesting Bulk Redirects
Only Firespring Support or your Onboarding Consultant can upload redirects in bulk. You'll need to prepare your CSV file and submit it to them.
- Prepare your CSV file following the format described above.
- Send your CSV file to one of the following:
- Your Client Onboarding Consultant (if you're in the process of launching a new site)
- Firespring Support at support@firespring.com
- Call Firespring Support at 877.447.8936
The Firespring team will upload your redirects for you and notify you when they're active.
If you encounter any issues with your redirects after they've been uploaded, check these common problems:
- Ensure there are no extra spaces at the beginning or end of your URLs in your CSV file.
- For new websites that aren't live yet, redirects will become active once your site launches.
Creating a Custom Page URL with Redirects
This style of shortcut redirect will come in handy on your website when you have pages that need to be more visible.
-
In your Site Structure, click the green Add Section button:
- This section will not display on your public site.
- Enter a short, descriptive Title. Your title should include the word Redirect. For example: Redirect Our Team
- Click Edit to update the URL. Remove the word Redirect from the URL, leaving the shorter title. For example: 'redirect-our-team' would become 'our-team'
- Leave the Section Location default setting of Root.
- Leave the Design Layout default setting.
- Toggle to No for Display in site navigation.
- Toggle to No for Include in sitemap.
- Click Save & Finish.
-
Add your hidden redirect page:
- Click the green Add Page button.
- Enter a Title for your redirect page. This can be the same as the section title. For example: Our Team Redirect
- Click Edit to update the URL. Remove the word Redirect from the URL, leaving the shorter title. For example: 'redirect-our-team' would become 'our-team'
- Leave the Location default setting.
- Leave the Design Layout default setting.
- Leave the Content template default setting of None (Custom Page).
- In Page redirect, toggle to To another page on your site.
- Select your Site structure in the dropdown menu if the page you're redirecting to lives on a different site structure.
- Select your Site page in the dropdown menu. This is the page you want to redirect to with your short URL.
- Keep the Default setting for Redirect code.
- Click Save & Finish.
-
Click the short URL (example: /our-team.html) to test your redirect.
Editing an Existing Redirect
-
Click the gear icon next to the page you wish to edit, then Edit Page Info.
-
In Page info, navigate to the Page redirect section.
-
Choose a different page in the Site page dropdown.
-
Click Save & Finish at the bottom of the page.
Deleting a Redirect
-
Click the gear icon next to the page you wish to edit, then Edit Page Info.
-
In Page info, navigate to the Page redirect section.

-
Toggle to No redirect.
-
Click Save & Finish at the bottom of the page.
Exporting Your Redirects
You can download a list of all your redirects as a CSV file:
-
From the Redirect page click the gray Export Redirects button.
-
Once the export has been created, click Download Your Export on the modal.
-
This will download a CSV to your computer, which you can open with Google Sheets or Excel.
Tips & Helpful Guidance
- Always test your redirects after creating them to make sure they work as expected.
- Be careful with the format of your URLs - they must be exact matches to work properly
- Don't create redirect loops where page A redirects to page B, which redirects back to page A.
- Redirects are processed in order - if multiple redirects match the same source URL, the first one in the list will be used.
- If a button appears grayed out, it might mean you don't have permission to use that feature - check with your website administrator.
- Keep your redirects organized by regularly removing ones you no longer need.
Troubleshooting
Problem: Your redirect isn't working
Solution:
- Double-check that the URL you are testing matches the redirect URL folder that you built.
- If you are testing the redirected URL and it isn't working, try testing the destination URL directly to make sure it works
- Clear your browser cache or try in a private/incognito window
Problem: You're seeing a "redirect loop" error
Solution:
- Check if you have redirects that point to each other in a circle. For example: page A is redirecting to page B, but page B is redirecting back to page A.
- Look for chains of redirects that might eventually loop back, then try removing one of the redirects in the chain to break the loop.
Problem: You can't add or edit redirects
Solution:
- Only Firespring Support is able to upload your redirects in bulk. Once you've created your CSV file, send it to Firespring Support to upload.
Problem: Your imported CSV file isn't working
Solution:
- Make sure your CSV file has exactly two columns, and the redirects are in the correct column.
- Check that the URLs are formatted correctly, with no extra spaces before or after each URL, or typos.
- Look for any special characters or formatting in your spreadsheet that might cause problems.
- Try creating a new, simple CSV file with just a few redirects to test.