Sending Online Proofs
Complexity Level: Basic to Advanced
Overview
Learn how to create online proofing forms, send proofs, manage proofing categories, and understand the email your reviewers receive.
Words used on this page
- Proof: A digital preview of a document before it goes to print.
- Proofing form: The form you fill out to send a proof to reviewers.
- Proofing category: A label used to group proofing forms (like "Brochures" or "Newsletters").
- Recipient: The person who receives the proof email.
- Reminder: An automatic email that nudges someone to respond.
- Content space: A place where your form content is stored (for example, "Primary").
When You Would Use This
Use this section if you need to:
- Create a proofing form for a project.
- Send a proof to reviewers by email.
- Manage proofing categories.
- Edit a proofing form.
- Update default reminder settings for proofs.
- Understand what the proof email looks like.
Step-by-Step Instructions
Viewing the Online Proofing Form List
-
In the left hand menu, click Online Tools, then Online Proofing.

-
This page will display any existing proofing forms, with the following information:
- Title
- Proofing category
- Modified date
- A Send Proof button
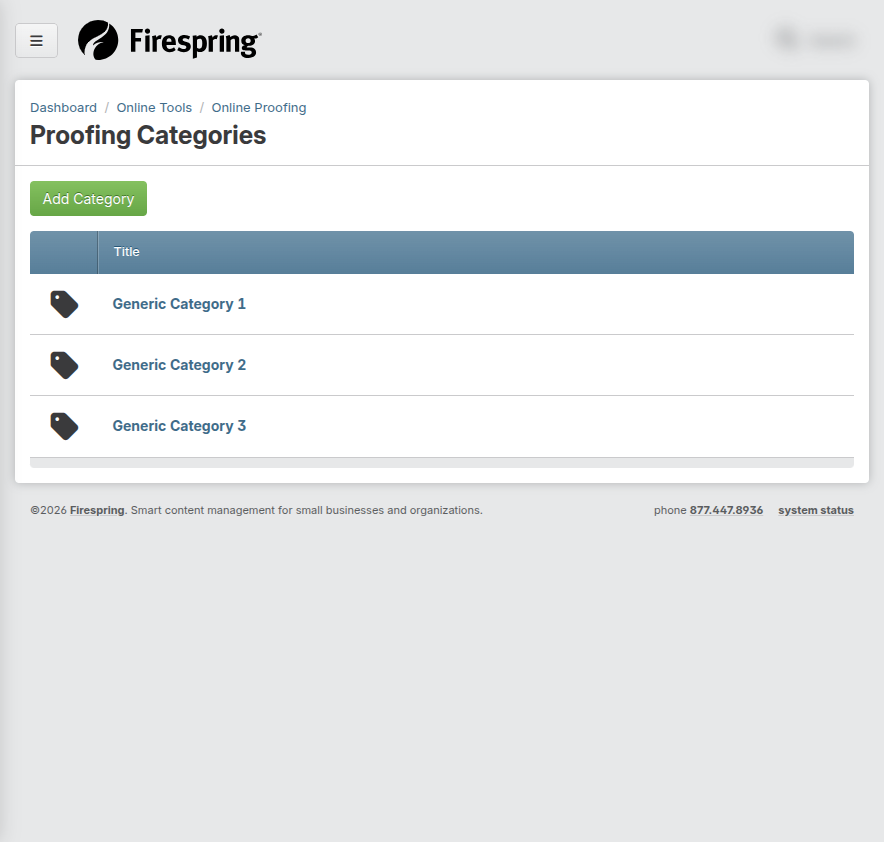
Managing Proofing Categories
Before you can add your first proofing form, you will need to have at least one Proofing Category.
-
From the Online Proofing list, click the grey Manage Proofing Categories button in the top right corner.
-
Here you will see your Proofing Categories list, which includes any pre-existing proofing categories.
-
Click the green Add Category button in the top left corner to create a new category.
-
Enter a Title for your category. To keep things organized, you can add a category for each portal that will be using the online proofing system.
-
Click Save & Finish, or use the arrow to click Save & Add Another to add another proofing category.
Adding a Proofing Form
-
In the left hand menu, click Online Tools, then Online Proofing.
-
Click the green Add Proofing Form button in the top left corner.
-
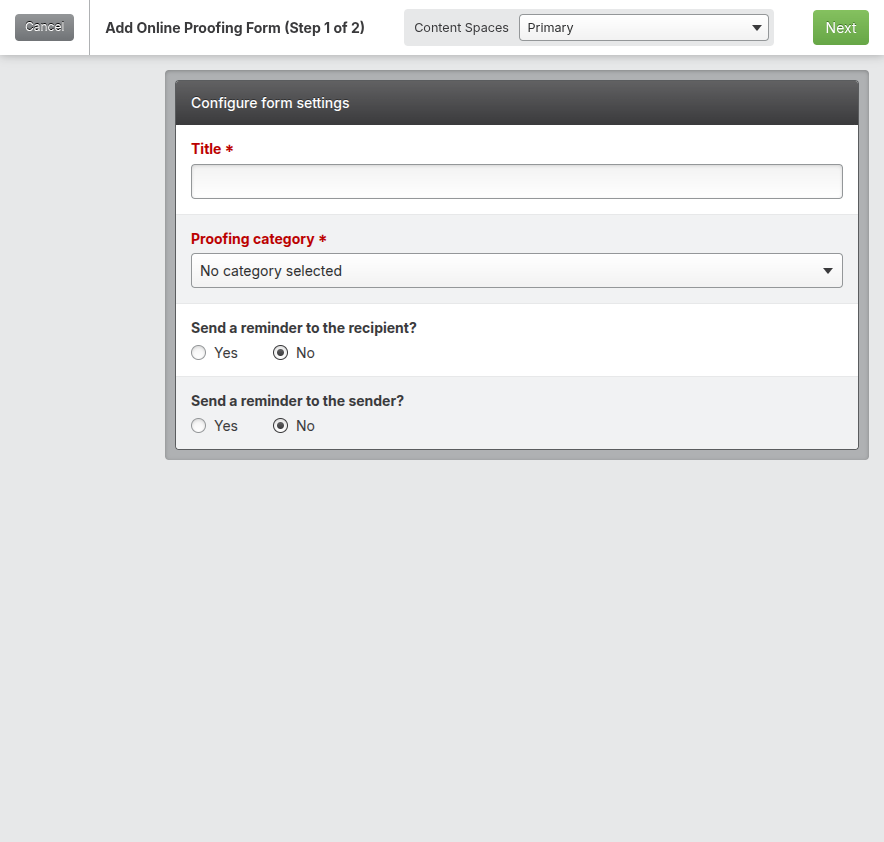
Fill out the form settings:
- Title: Enter a Title for your form. To keep things organized, your title can match the portal for which you will be using this form.
- Proofing category: Select your Proofing category using the dropdown menu.
- Send a reminder to the recipient: Toggle to Yes to configure your default information for when a reminder should be sent to the proof recipient. Use the dropdown menu to select your Send reminder in default. Update the default Subject and Message as needed.
- Send a reminder to the sender: Toggle to Yes to configure your default information for when a reminder should be sent to the proof sender. Use the dropdown menu to select your Send reminder in default. Update the default Subject and Message as needed.
-
Click the green Next button in the top right corner.
-
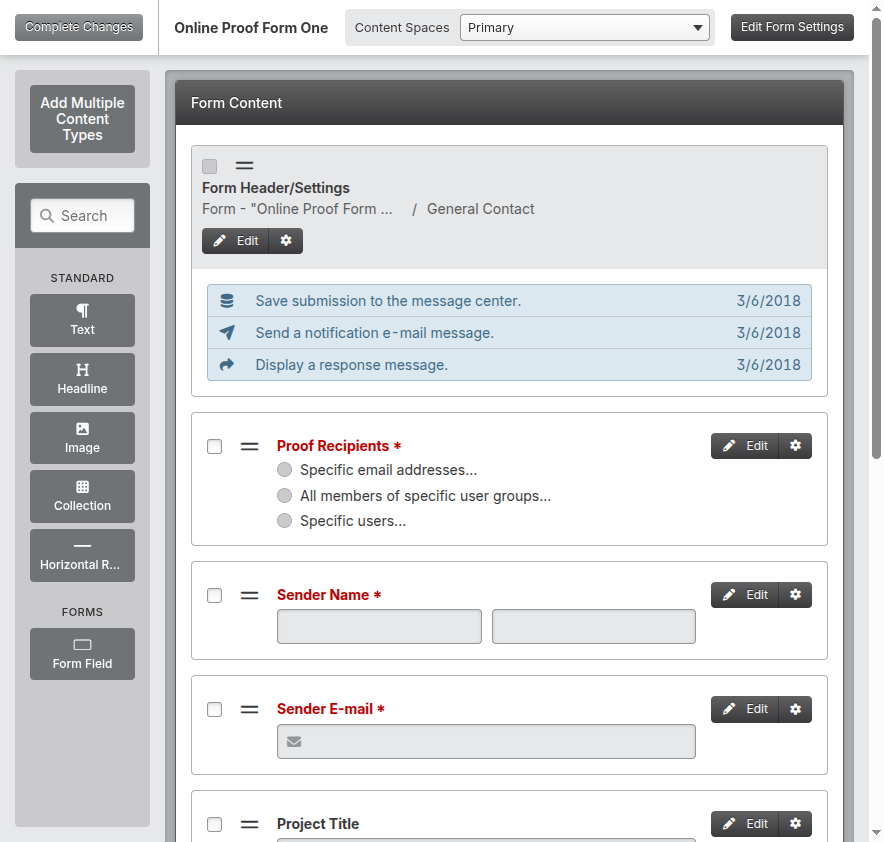
Next, you'll configure your Proofing Form Content. A default proofing form will automatically populate.
-
Click Edit next to any existing Form Fields to update the Title and requirement options.
-
To add a new form field, locate the Form Field content type in the left hand menu. Drag the Form Field content type to your preferred location on the form, and drop it into place.
-
Click your preferred Form Field type, then update the required information as needed. Click Save & Close when you are done to add the form field to the page.
-
When you have finished editing your proofing form, click the green Finish button in the top right corner.
Updating the Proofing Form and Reminder Settings
You can update the proofing form settings, and default reminder settings, whenever necessary.
-
In the left hand menu, click Online Tools, then Online Proofing.
-
Click the title of the proofing form for which you would like to update reminder settings.
-
In the top right corner, click the grey Edit Form Settings button.
-
Make any necessary updates to the Form info settings.
-
When you've finished making your changes, click Save & Finish.
-
Click the grey Complete Changes button in the top left corner to return to the Online Proofing list.
Sending a Proof
-
From the Online Proofing list, find the form you want to use to send your proof.
-
Click the green Send Proof button to the right of the form.
-
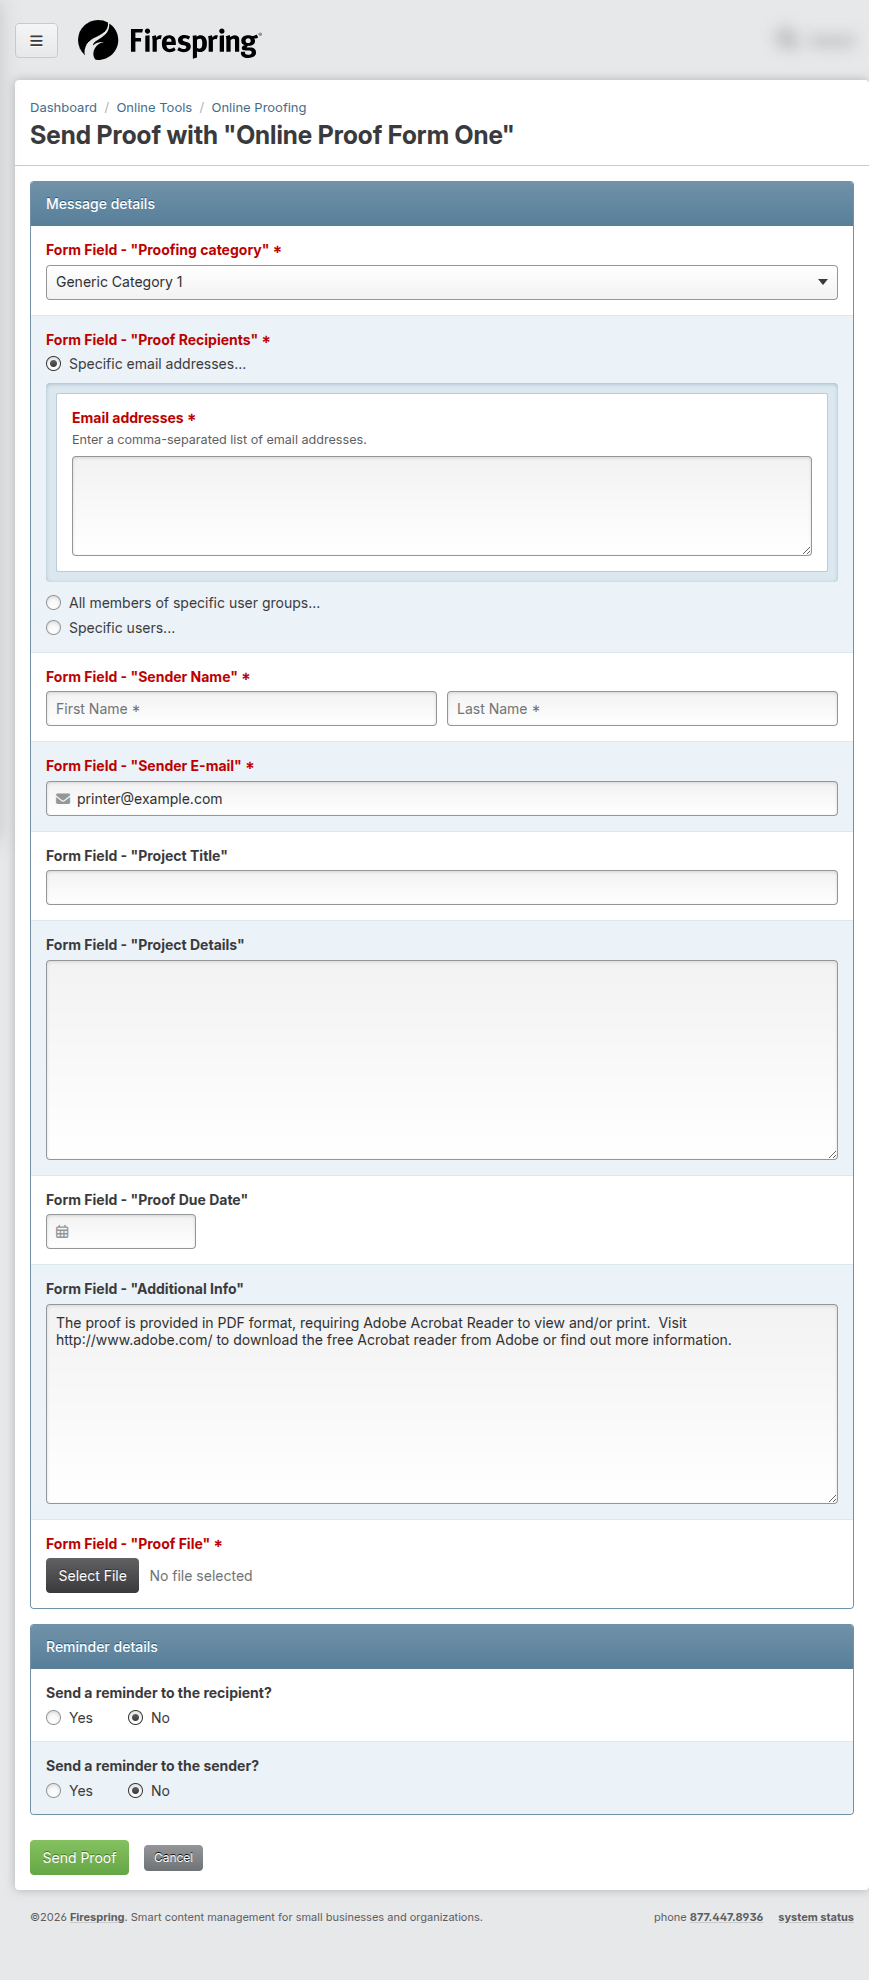
Update your Proofing category if necessary using the dropdown menu.
-
Choose your Proof Recipients. You have the ability to send a proof to:
- Specific email addresses: Enter your chosen email address, or multiple email addresses separated by commas.
- All members of a specific user group: Choose your User group by selecting it in the Available items list, then use the right arrow (>) to move it to the Selected items list.
- Specific users: Choose your website user(s) by selecting a name in the Available items list. Use the right arrow (>) to move it to the Selected Items list.
-
Fill out the required fields on the form, and any additional information you wish to supply to your proof recipient(s).
-
Click Select File to attach your proof file(s). A total of 2GB can be sent at a time. If you are sending multiple files at a time, the total combined file size will need to be 2GB or smaller.
File sizing
To keep file size down, upload a lower-resolution version of the print file for your recipient to view online. You might even consider including a watermark in the background of the file to let your customer know the file is specifically for proofing purposes.
-
Update your Reminder details as needed:
- Send a reminder to the recipient: The recipient reminder details will auto-default to the settings configured when building your proofing form. You can update the Send reminder in, Subject and Message as needed, or toggle to No to turn off the reminder message.
- Send a reminder to the sender: The sender reminder details will auto-default to the settings configured when building your proofing form. You can update the Send reminder in, Subject and Message as needed, or toggle to No to turn off the reminder message.
-
Click Send Proof.
The attachments you send for proofing will be available for download for 30 days. After 30 days the file(s) will be removed from the server to ensure your website continues to run smoothly.
Understanding the Proof Email
When a proof is sent, recipients will receive an Online Proof Notification email.
This email includes:
- Overview: This section includes a timestamp of when the proof was sent.
- Details: This section includes the form field information entered when the proof was sent, and a Download Your Files button with the included file(s).
Adding the Online Proofing Approval Form to a Portal Page
With Online Proofing you have the ability to display proofs in your password protected portals using the proofing categories.
-
Click My Website, then Portals (under Libraries).
-
Click the title of the portal in which you wish to display online proofing.
-
Click the title of the page you would like to edit.
-
In the left hand menu, locate the Online Proofing content type, in the Commerce section.
-
Drag the Online Proofing content type to your preferred placement on the page, and drop it into place.
-
Update the Content location if desired. This will default to the content space in which the content was placed.
-
Update the Content position if desired. This will default to the order in which the content was placed.
-
Select your Proofing categories. You can select one or more of the categories you created for proofing. Documents in the selected category will display within this portal.
-
Choose your preference for Display history by toggling to Yes or No. If you choose yes, your proofing history will also display on the page.
-
Click Save & Close.
Now proofs that are sent, that are associated with the category set to display on this page will display for any users that have access to this portal page. You can set permissions for the portal, and on a per page basis within the portal.
Users can approve proofs directly on the page, and can include comments or additional information as needed. They have the option to approve the proof as provided, approve the proof with changes that they have included, request another proof based on their comments, or cancel the project.
Using the Message Center for Online Proof Responses
Proofs approved through a portal will generate a notification email to your team. The details will also be recorded in your Message Center, so you can access all responses in one place.
-
In the left hand menu, click Message Center.
-
Use the dropdown menus at the top of the page to sort your messages based on date received and message type. You can sort by Online Proof Response to view a list of all proof responses. You can also use the Search bar to search for a specific message if needed.
-
Click the Title of a message to view the Online Proof Response details. You can view the original proof from this page, and download any files sent in response by your customer.
Exporting Online Proof Responses from the Message Center
The Message Center allows you to export messages to keep things organized. You can export a list of Online Proofing Responses when necessary.
-
In the left hand menu, click Message Center.
-
Click the grey Export Messages button in the top right corner.
-
Use the dropdown menu to select your Message date(s). You can choose one of the preset options, or set a specific date or date range.
-
In the Message types box, choose Online Proof Response.
-
Click Begin Export.
-
When your export has been generated, click the green Download Your Export button.
-
Once you've downloaded your export, you can click Run Another Report to run a different export, or Close to return to the Message Center.
Tips, Notes, and Helpful Guidance
- Use clear titles: Titles help reviewers know what project the proof is for.
- Pick the right category: Use categories that match your portals, or user groups, so similar proofs are organized.
- Keep reminders on if needed: Reminders help reviewers respond on time.
- Check your fields: Make sure the proofing form fields match the information you need to include with your proofs.
- Use the message center export: This keeps a record of Online Proofing Responses that you can easily export for book keeping purposes.
Troubleshooting
Problem: You don’t see the Online Proofing list
Solution:
- Make sure you are on the Online Proofing page in the left menu.
- Check if your role allows access to Online Proofing.
- Work with your website's Primary Administrator to update your Springboard permissions.
Problem: A category is missing
Solution:
- Go to Manage Proofing Categories and check the list.
- If you still can't find the category, click the green Add Category button to add a new category.
Problem: The email did not arrive
Solution:
- Ask the recipient to check spam or junk folders.
- Confirm the recipient email address is correct.
- Try sending the proof again, or use the customer's portal to display an Online Proof.
Summary
Online Proofing lets you build proofing forms, send proofs by email, and organize forms by category. Use clear titles, keep fields up to date, and check the email details before sending.